We've all been there. You're working in NetSuite, making what seems like a minor update to a saved search, and suddenly realize you've overwritten the title of an important search. Panic sets in. What was the original title? Who changed it? When did this happen?
Before you start frantically searching through emails or asking colleagues, take a deep breath. NetSuite's Analytics Audit Trail has your back.
The Power of NetSuite's Audit Trail
NetSuite's audit trail feature is like a time machine for your data. It tracks every change made to records, fields, and yes – even saved search titles. This powerful tool is often underutilized, but once you know how to harness it, you'll wonder how you ever lived without it.
Step-by-Step: Recovering Your Saved Search Title
Let's walk through the exact process to recover an overwritten saved search title:
Step 1: Create an Analytics Audit Trail Search
- Navigate to Reports > New Search
- Select Analytics Audit Trail as your search type
- Click Create
Step 2: Configure Your Search Criteria
Now we'll set up specific filters to find your title change:
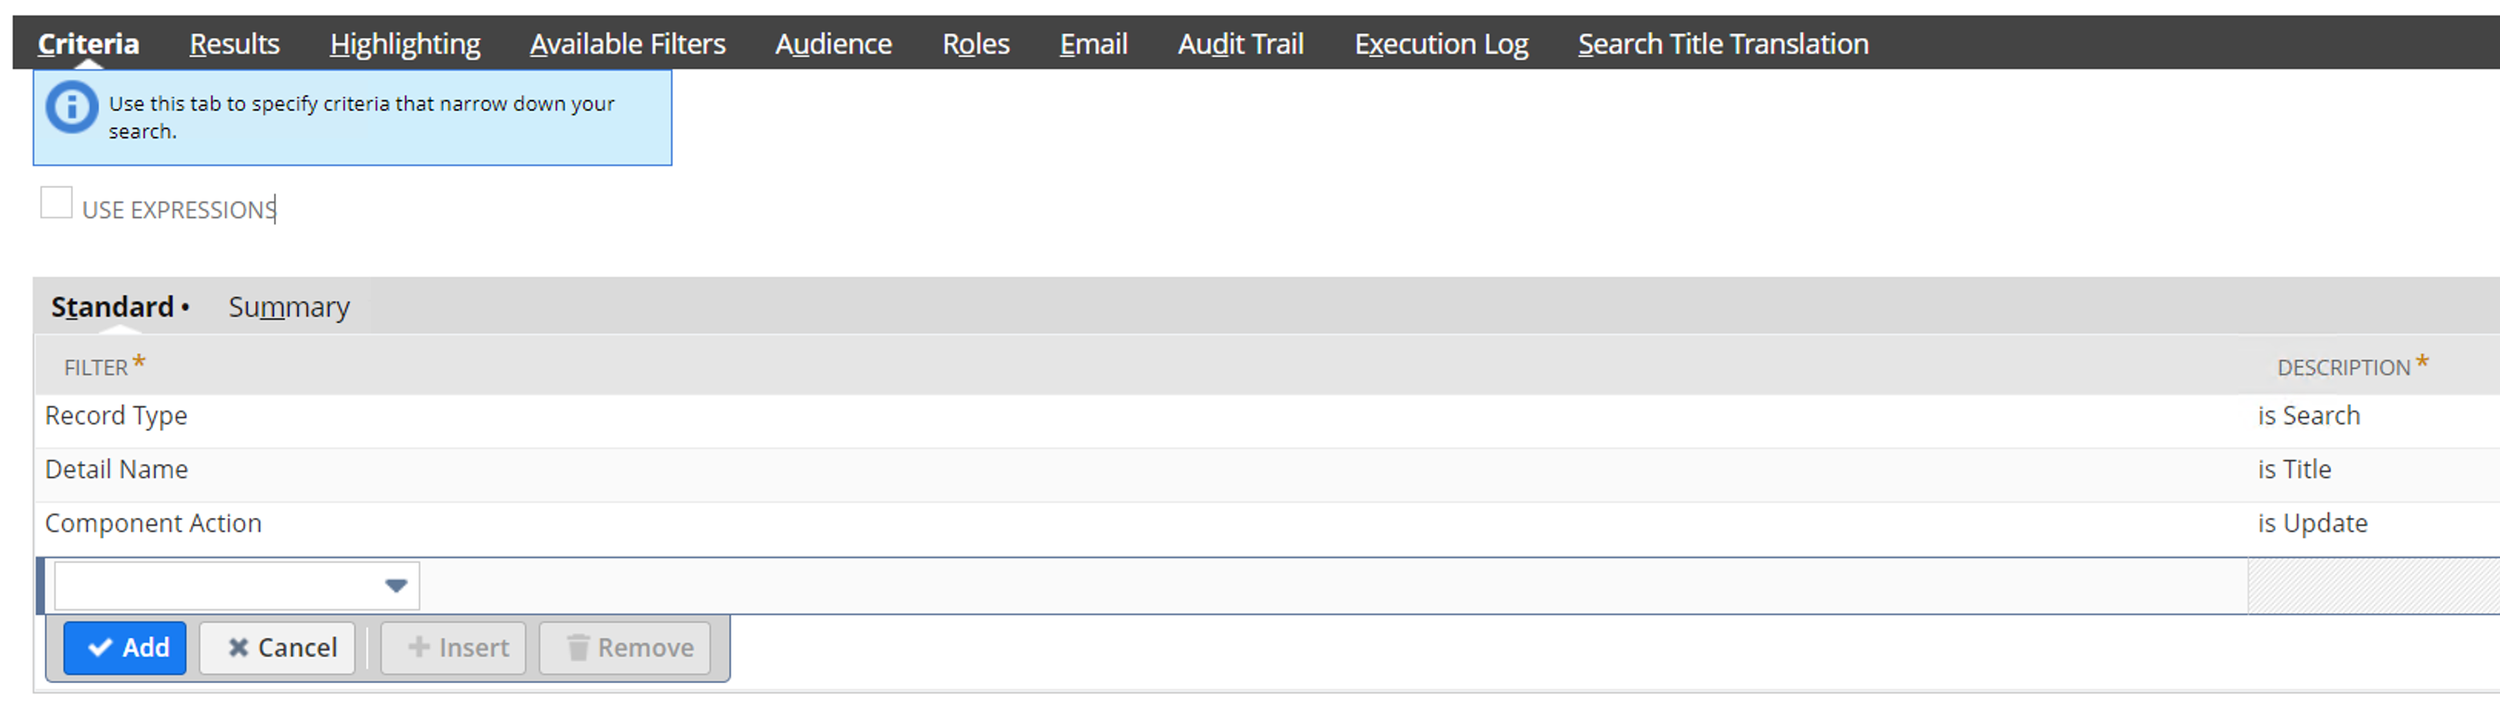
In the Criteria tab, add these filters:
Record Type = Search
- This focuses only on saved search changes
Detailed Name = Title
- This isolates title modifications specifically
Component Action = Update
- This shows only when titles were changed (not created)
Date Range (Optional but recommended)
- Set a range around when you think the change occurred
- This speeds up the search and makes results manageable
Step 3: Set Up Your Results
Configure these columns to see all the information you need:
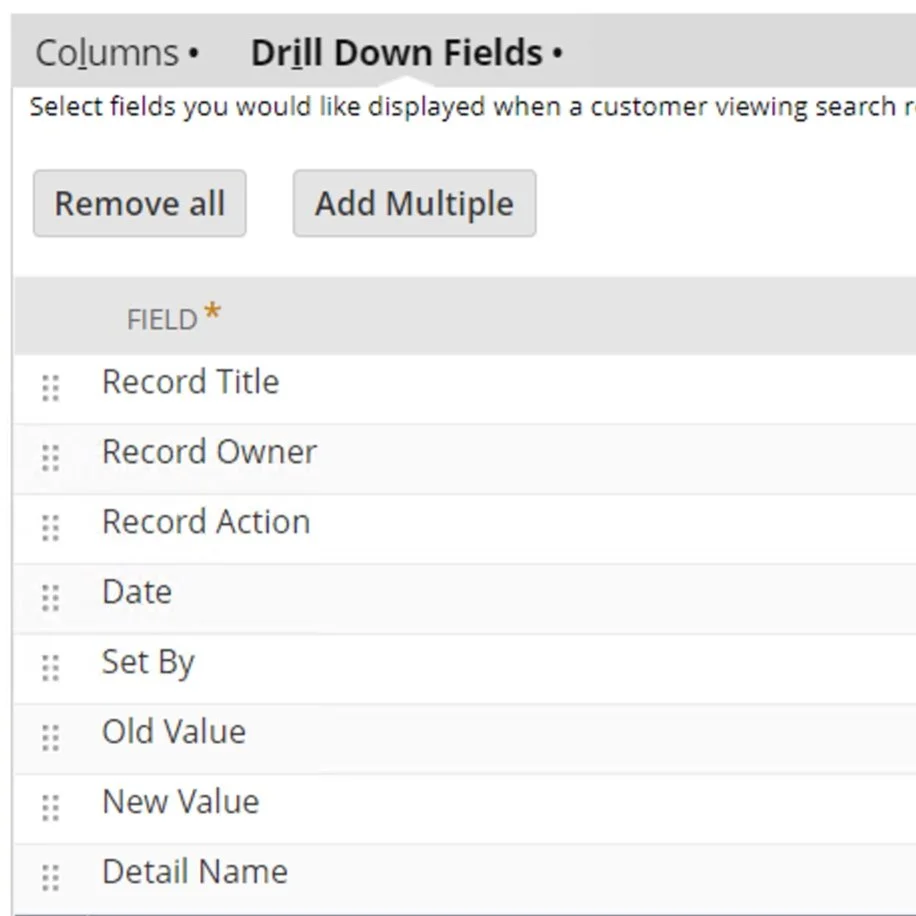
Recommended Result Fields:
- Record Title - Shows the current search name
- Record Owner - Identifies who owns the search
- Record Action - Confirms the type of change
- Date - When the change occurred
- Set By - Who made the change
- Old Value - THE GOLDEN TICKET! Your original title
- New Value - What it was changed to
- Detail Name - Confirms this was a title change
Step 4: Save and Run Your Search
- Give your audit search a descriptive name like "Saved Search Title Changes Audit"
- Click Save & Run
- Review the results to find your specific search and its original title
Pro Tips for Audit Trail Mastery
1. Create a Dashboard Portlet
Set up a dashboard portlet that shows recent saved search modifications. This helps you catch changes early and maintain visibility.
2. Schedule Regular Audit Reports
Configure your audit search to email you weekly summaries of critical changes. Prevention is better than recovery!
3. Expand Your Audit Scope
Don't limit yourself to saved searches. Use similar techniques to track:
- Custom field modifications
- Workflow changes
- Script deployments
- User permission updates
4. Filter by Specific Users
If you know who might have made the change, add a "Set By" filter to narrow results quickly.
5. Use Old Value Searches
Create searches that specifically look for certain old values being changed. This is invaluable for maintaining naming conventions.
Common Scenarios and Solutions
Scenario 1: Mass Title Updates
Problem: Someone ran a CSV import that changed multiple search titles Solution: Add "Record Action = Mass Update" to your criteria
Scenario 2: Finding All Changes by a Specific User
Problem: A team member left, need to audit all their changes Solution: Create a search with "Set By = [User Name]"
Scenario 3: Tracking Deletion of Searches
Problem: A saved search disappeared Solution: Change "Component Action" to "Delete" in your criteria
Advanced Audit Trail Techniques
Creating a Change History Report
Combine multiple audit searches to create a comprehensive change history:
- Saved Search changes
- Report modifications
- Dashboard updates
- KPI adjustments
Setting Up Alerts
Create a workflow that sends immediate notifications when critical searches are modified:
- Trigger: Analytics Audit Trail record created
- Condition: Record Type = Search AND Critical Search List contains Record
- Action: Send email to administrators
Audit Trail Best Practices
- Regular Reviews: Schedule monthly audit trail reviews
- Documentation: Keep a log of intentional changes
- Access Control: Limit who can modify critical searches
- Naming Conventions: Use prefixes to identify search purposes
- Change Management: Implement a process for search modifications
Troubleshooting Common Issues
Issue: No Results Found
Solutions:
- Expand your date range
- Check if audit trail is enabled for saved searches
- Verify you have permission to view audit trails
Issue: Too Many Results
Solutions:
- Narrow your date range
- Add more specific criteria
- Use the search's ID if known
Issue: Missing Old Values
Solutions:
- The change might have been made before audit trail was enabled
- Check if the field was previously empty
Beyond Recovery: Proactive Audit Management
Implement Change Controls
- Create a "Change Request" custom record
- Require approval before modifying critical searches
- Link audit trail records to change requests
Build an Audit Dashboard
Include these KPIs:
- Number of searches modified this week
- Most frequently changed searches
- Users making the most modifications
- Searches without recent updates
Conclusion
NetSuite's Analytics Audit Trail transforms what could be a crisis into a minor inconvenience. By mastering this tool, you not only recover from mistakes but also gain invaluable insights into how your NetSuite instance evolves over time.
Remember: every change leaves a trace. With the right search configuration, you can uncover any modification, understand its context, and maintain the integrity of your NetSuite environment.
The next time someone asks, "What happened to that saved search?" you'll confidently reply, "Give me two minutes, and I'll tell you exactly what happened, when, and who did it."
Need help setting up comprehensive audit trails in your NetSuite instance? Contact Contra Systems for expert guidance on audit trail configuration and best practices.
Contra Systems
Your trusted NetSuite consulting partner, helping businesses optimize their ERP systems with expert solutions and dedicated support.